


The bigger your project the more state you need to manage. This article explains how to use/set up redux toolkit for state management in react.
This article assumes you have a basic understanding of React and javascript in general. A code sandbox of the project is provided at the end of the article. you can check out the project structure among other things there.
Why redux toolkit?
Redux helps us to manage app-wide states. In other words, State that we would like to share across various components like user authentication status, etc. An alternative to redux is context API. so why redux toolkit? It reduces lots of boilerplates that redux has. So you can think of redux toolkit as a package that helps to write redux more elegantly.
How does it works?
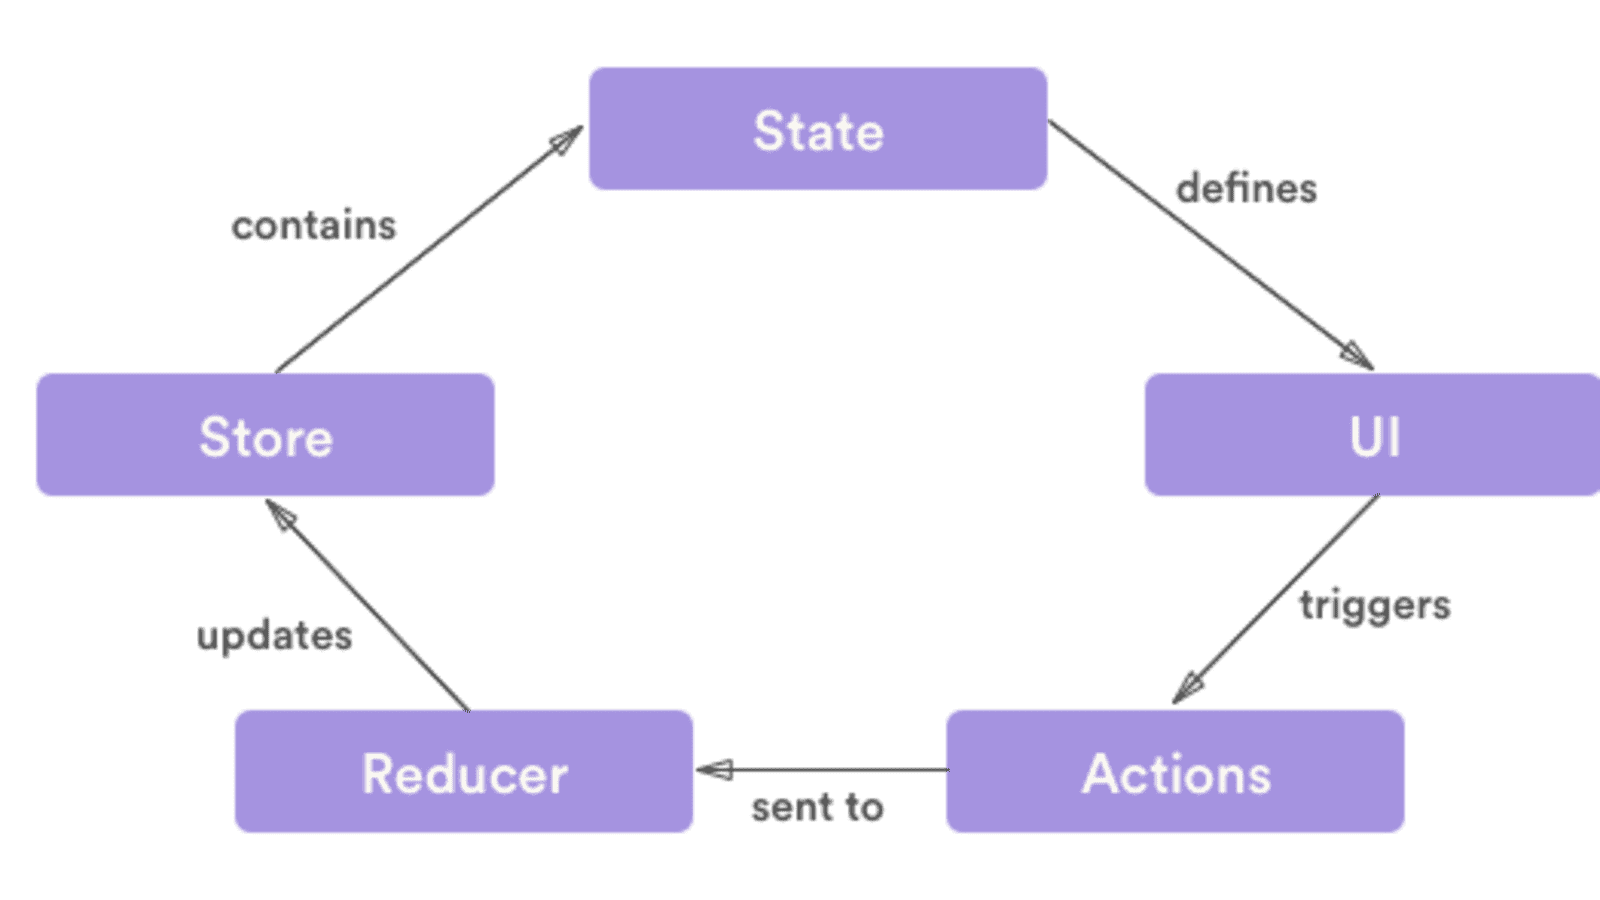
To understand how redux state management works. This image perfectly demonstrates it.
https://stackoverflow.com/questions/45416237/axios-calls-in-actions-redux
We store our state in the store, The only thing permitted to change/mutate the state in the store is a reducer function. if that's the only thing permitted to change/mutate our store what then triggers the reducer function? A dispatch function/Action.
A high-level overview will be, for instance, we click a button which triggers a dispatch function which in turn is sent to the reducer function which is responsible for updating the state. After the state is updated our components will automatically be re-rendered with the new state.
Installing Redux Toolkit
To understand more, we are going to do a simple project where we use redux toolkit to set user authentication status in our store.
The first step to get started is to install redux toolkit and redux in our react app with:
npm install @reduxjs/toolkit react-redux
Creating a slice
After successful installation, we create an auth slice using createSlice from redux toolkit. createSlice requires three fields: the name, initialState, and reducer.
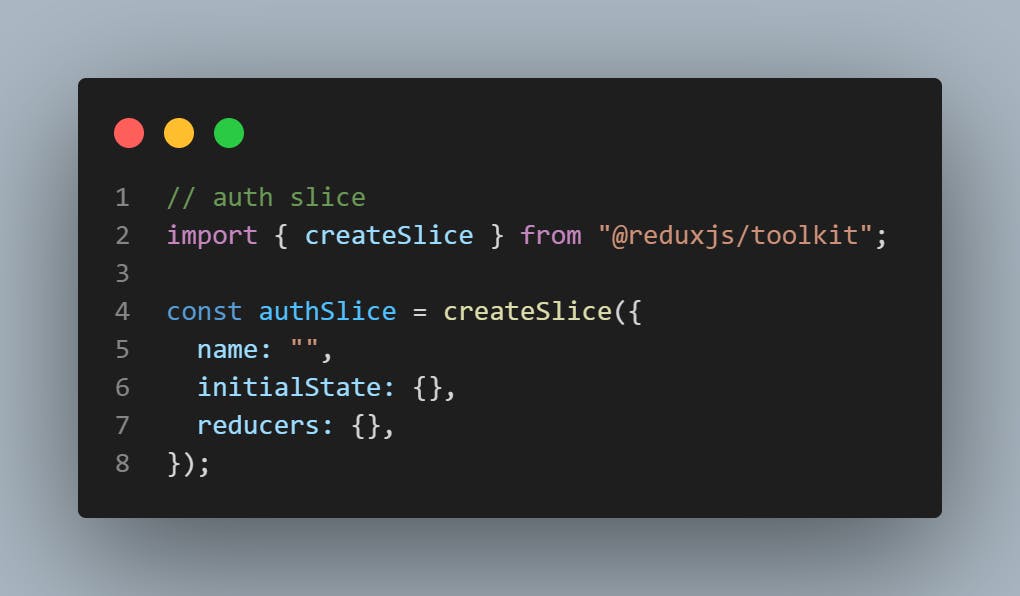
nameidentifies the name of our slice.initialStateis the initial state value of the state.reducersis an object that will contain functions.
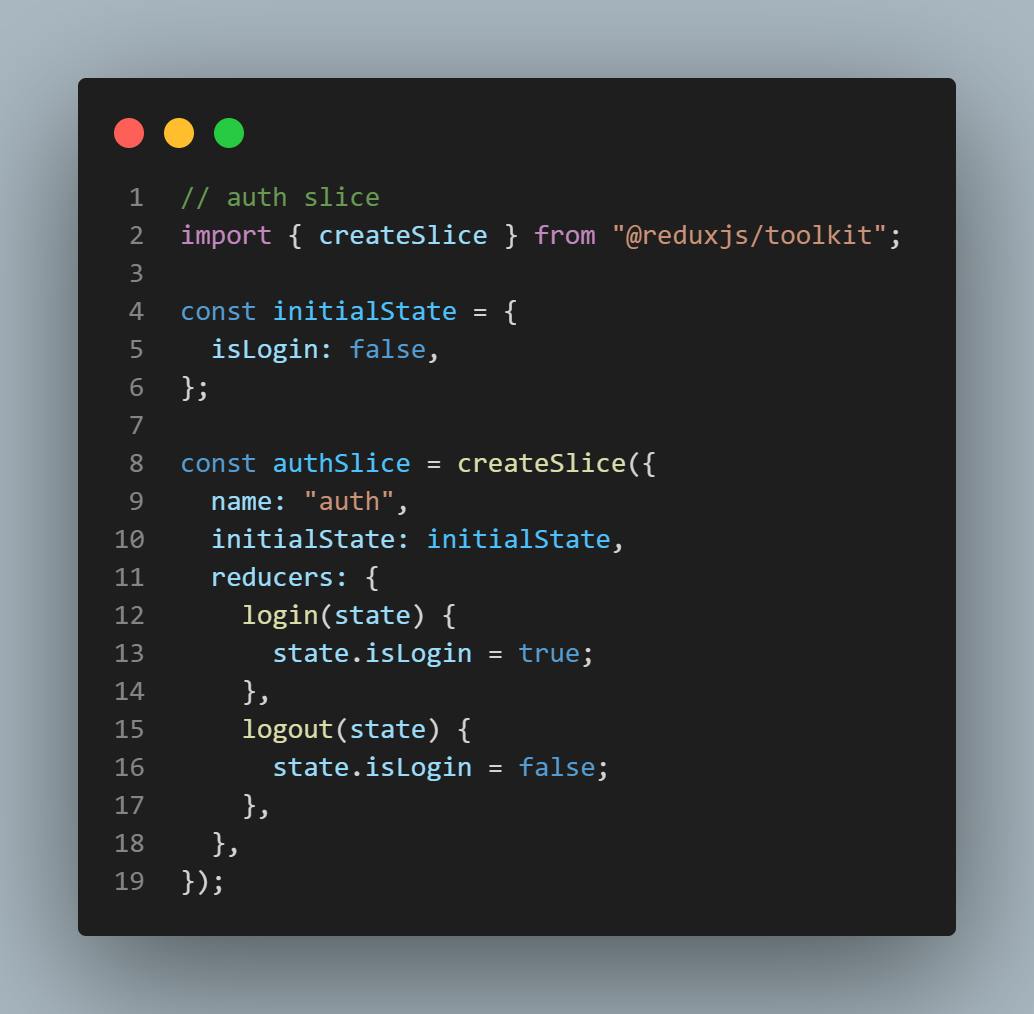
let's set the name to auth, the initial state to an object of isLogin with its value, and the reducer will contain two functions login and logout. with that we have:
We are almost done setting up the createSlice function but we still need two things from it. one is its actions and the second is the reducer. Why? remember the only thing permitted to mutate the store is the reducer so we need to export it to configure it with the store later on. If the reducer is gonna be changing the state, the store(which we will also set up very soon) needs to know about it. Why actions too? right now we have two reducer functions (logout and login). actions will determine the particular reducer function we want to be implemented on the store. from our example, that is either the login or logout function.
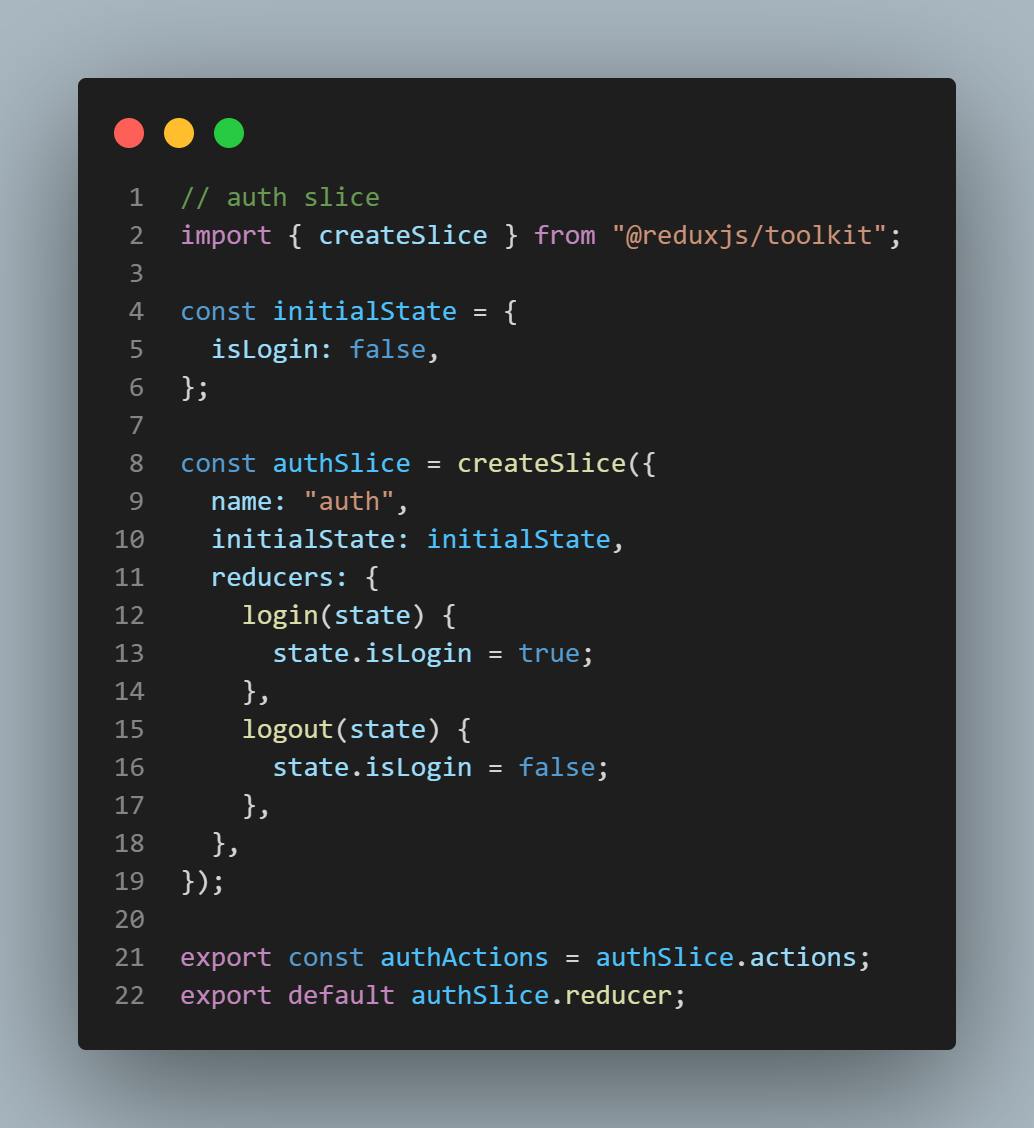
We are going to export authReducer as default while authActions as a constant. we will need them later on. with that, we are done with the auth slice section. we can move to the store section.
Setting Up The Store
To create a store section we use configureStore from redux toolkit. configureStore combines all the various store slices we might have into one. In our case, we have just one slice(auth slice) but in a bigger project, you might have more than one.
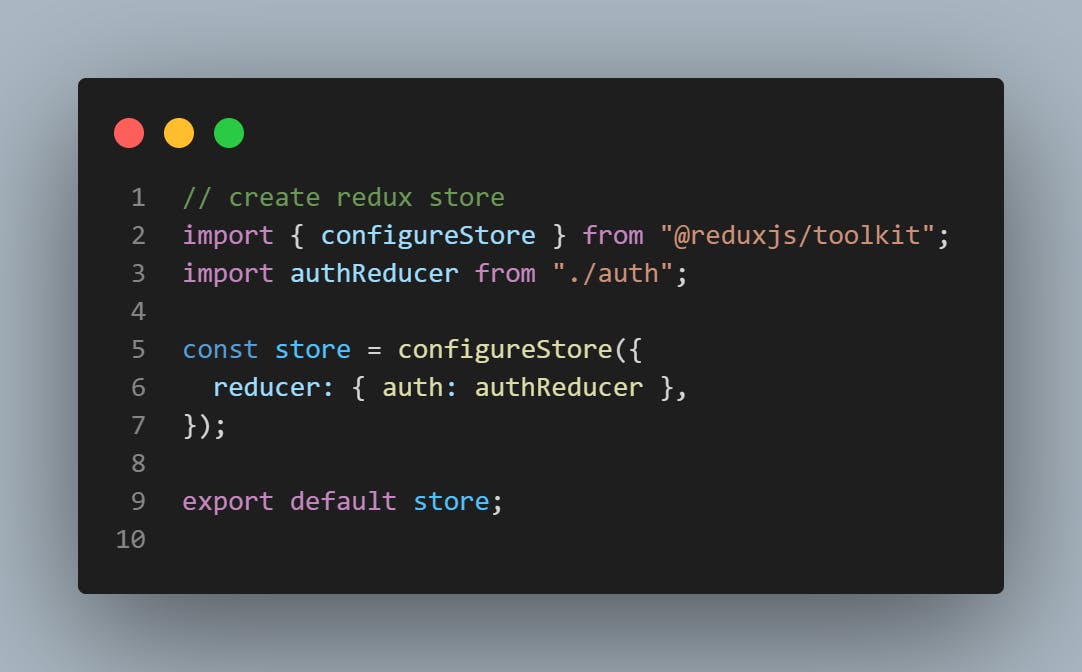
configureStore expects a reducer field which is an object that contains a key-value pair. The key is the name of our auth slice while the value will be our auth reducer function. We exported it as default from the auth slice file, we can import it with any name of our choice in this case authReducer.
A high level of what we are doing is telling the store "hey we have a store slice named auth and also its reducer is named authReducer". If we had more than one store slice let's say we have a count slice. which would have been created similar to how we created the auth slice. we would have also included it here i.e reducer{auth:authReducer, count: countReducer}. Thereby telling the store "hey we have two store slices (auth and count) and two reducers (authReducer and countReducer). "
You will notice we are also exporting the variable store which means we need it somewhere else in our application but where?!? we will use it along with the provider component.
The Provider
To ensure all our react components have access to this store, we go to the topmost file in react.
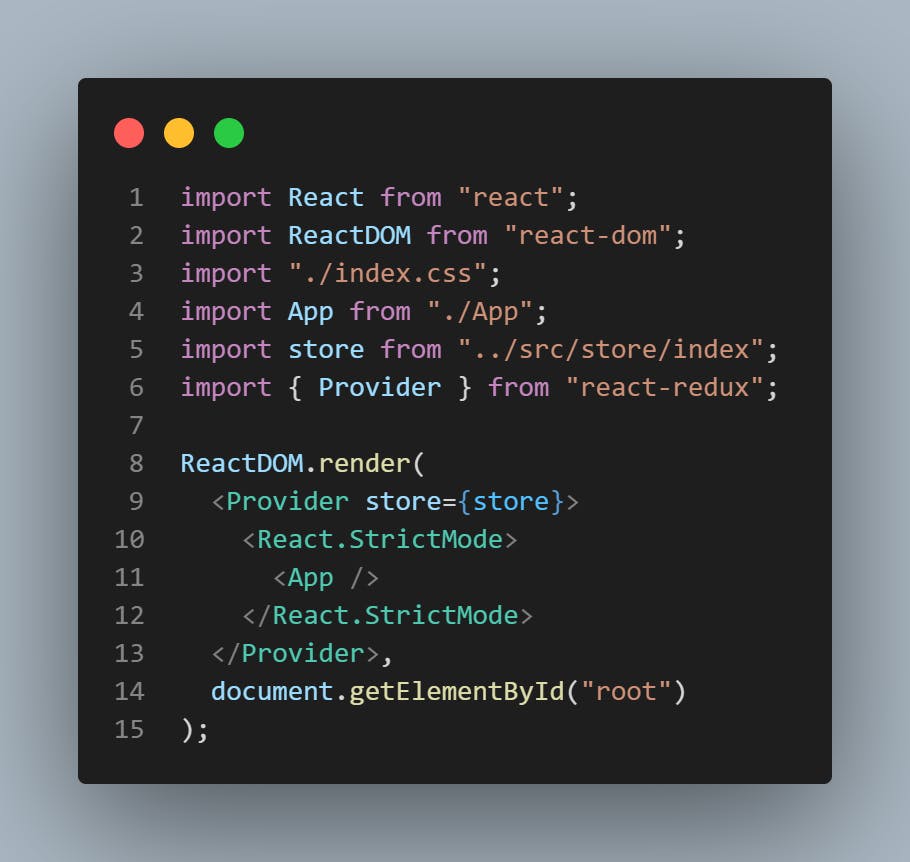
We import Provider from react-redux and then wrap it around the app component, provider expects a store. We pass our previously exported store to it.
Actions
So far we have created our store and configured it so that the only thing permitted to change it are reducers. but how do we trigger a change to this store we configured - Actions.
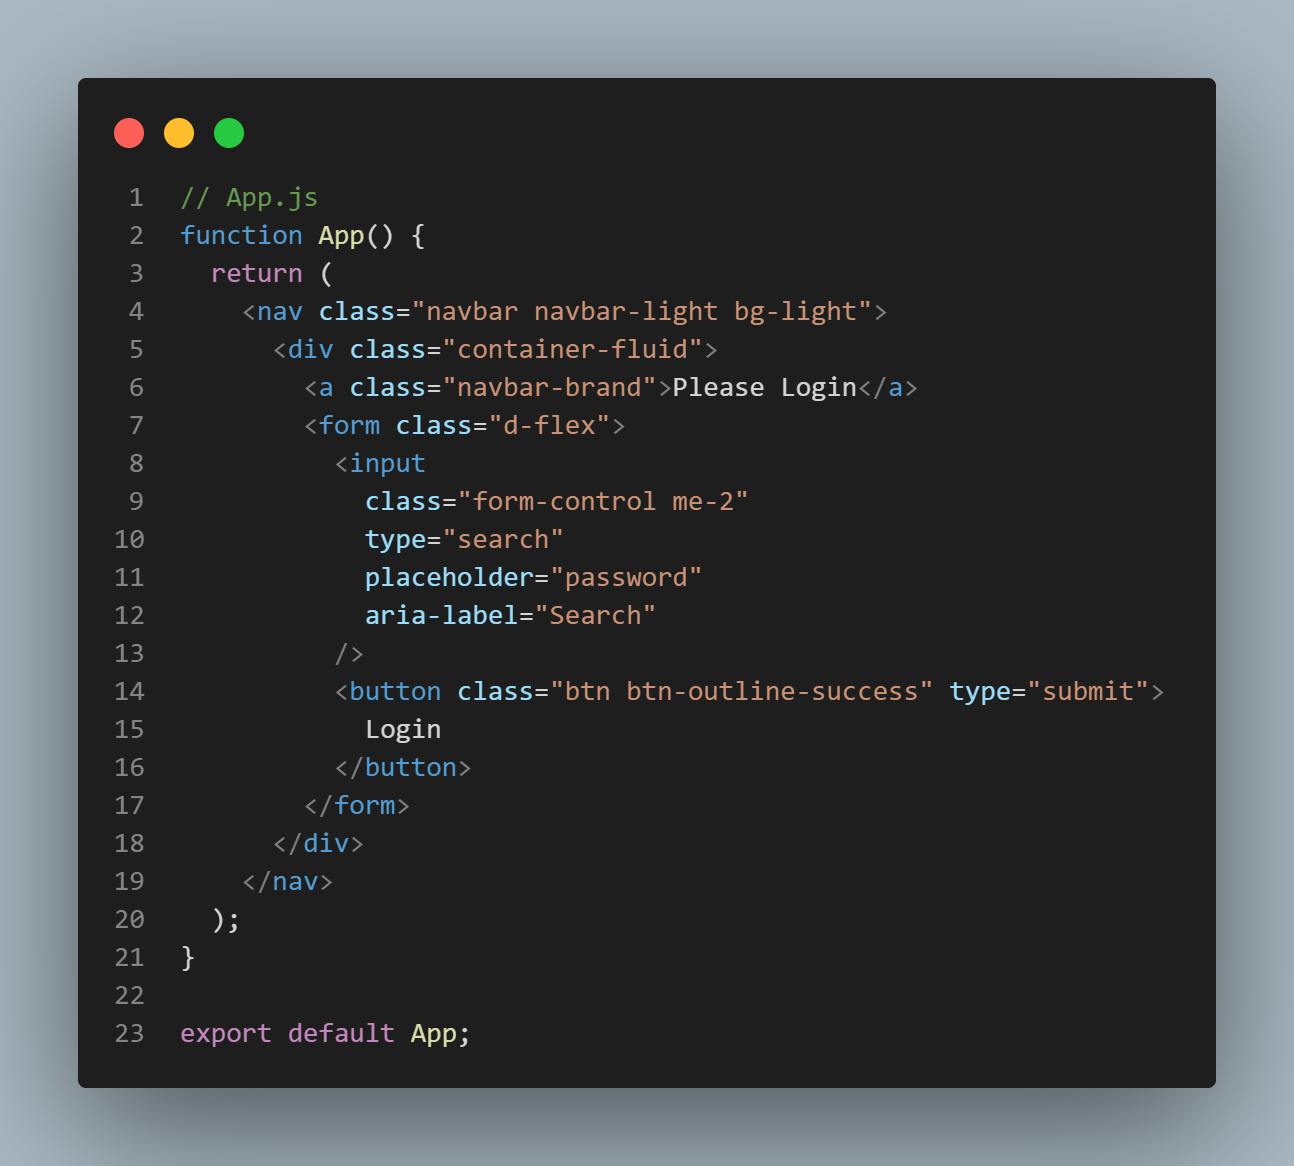
let's set up a simple UI for this. we will use bootstrap to achieve this simple layout.

the code
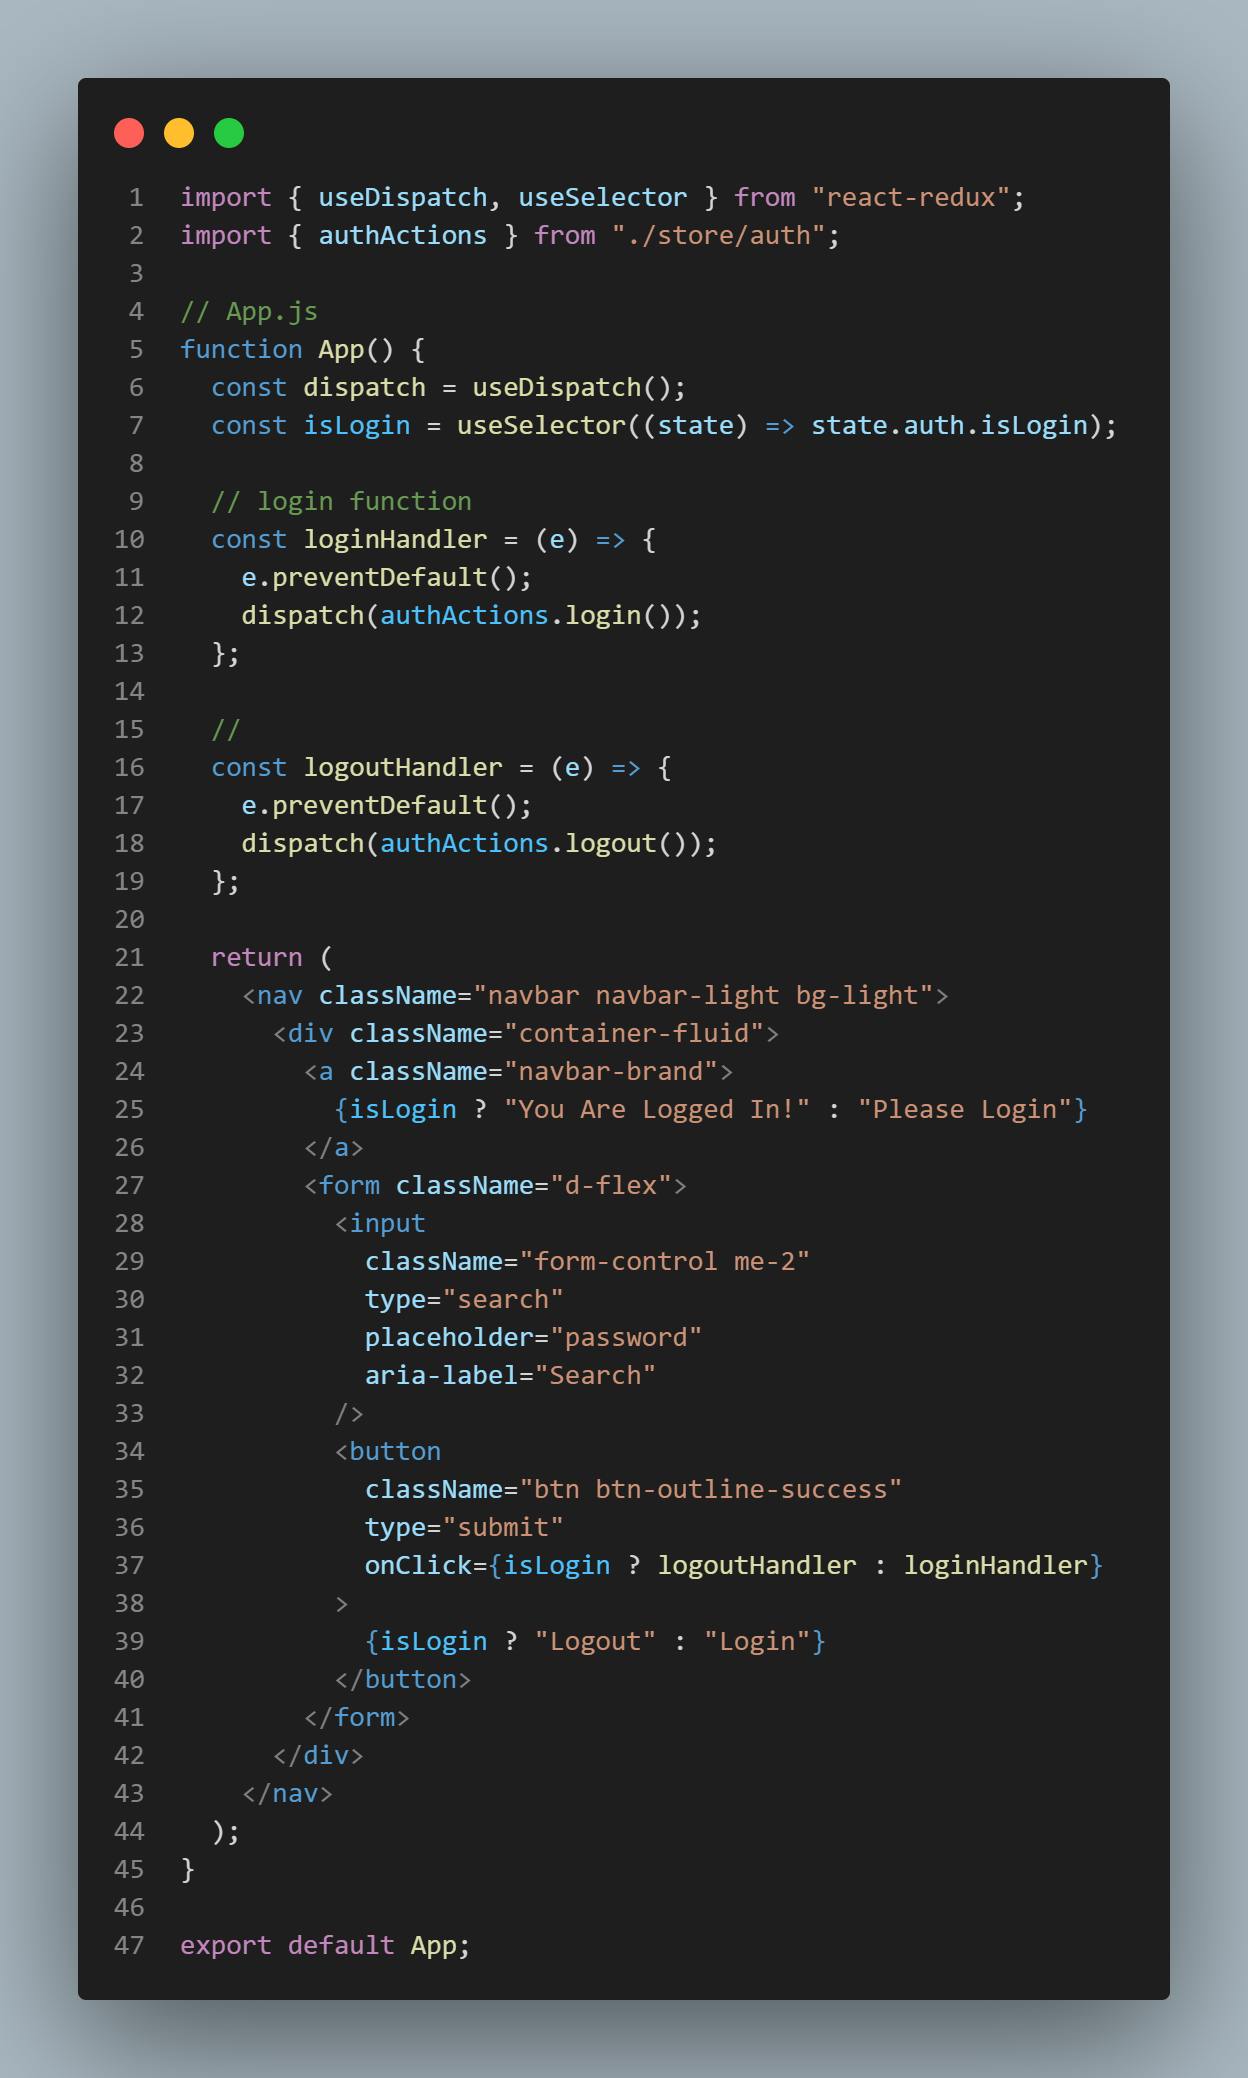
Here is the workflow we want to achieve, when we click on the login button we want a state change of isLogin from false to true. This is where our previously exported authActions will come in handy. On the login button, we are going to add a loginHandler function.

To dispatch an action we use the useDispatch hook from react-redux. dispatch is an action that triggers any reducer function. in this case, we use authActions to trigger the login reducer function. This will mutate/change isLogin (which has an initialState of false) to true.
Using The New State
Great! we have been able to set up an action that can trigger a state change. How then do we use the new state? we can use useSelector hook for it. useSelector hook is used to select the particular state we need. in this case we need the isLogin state.
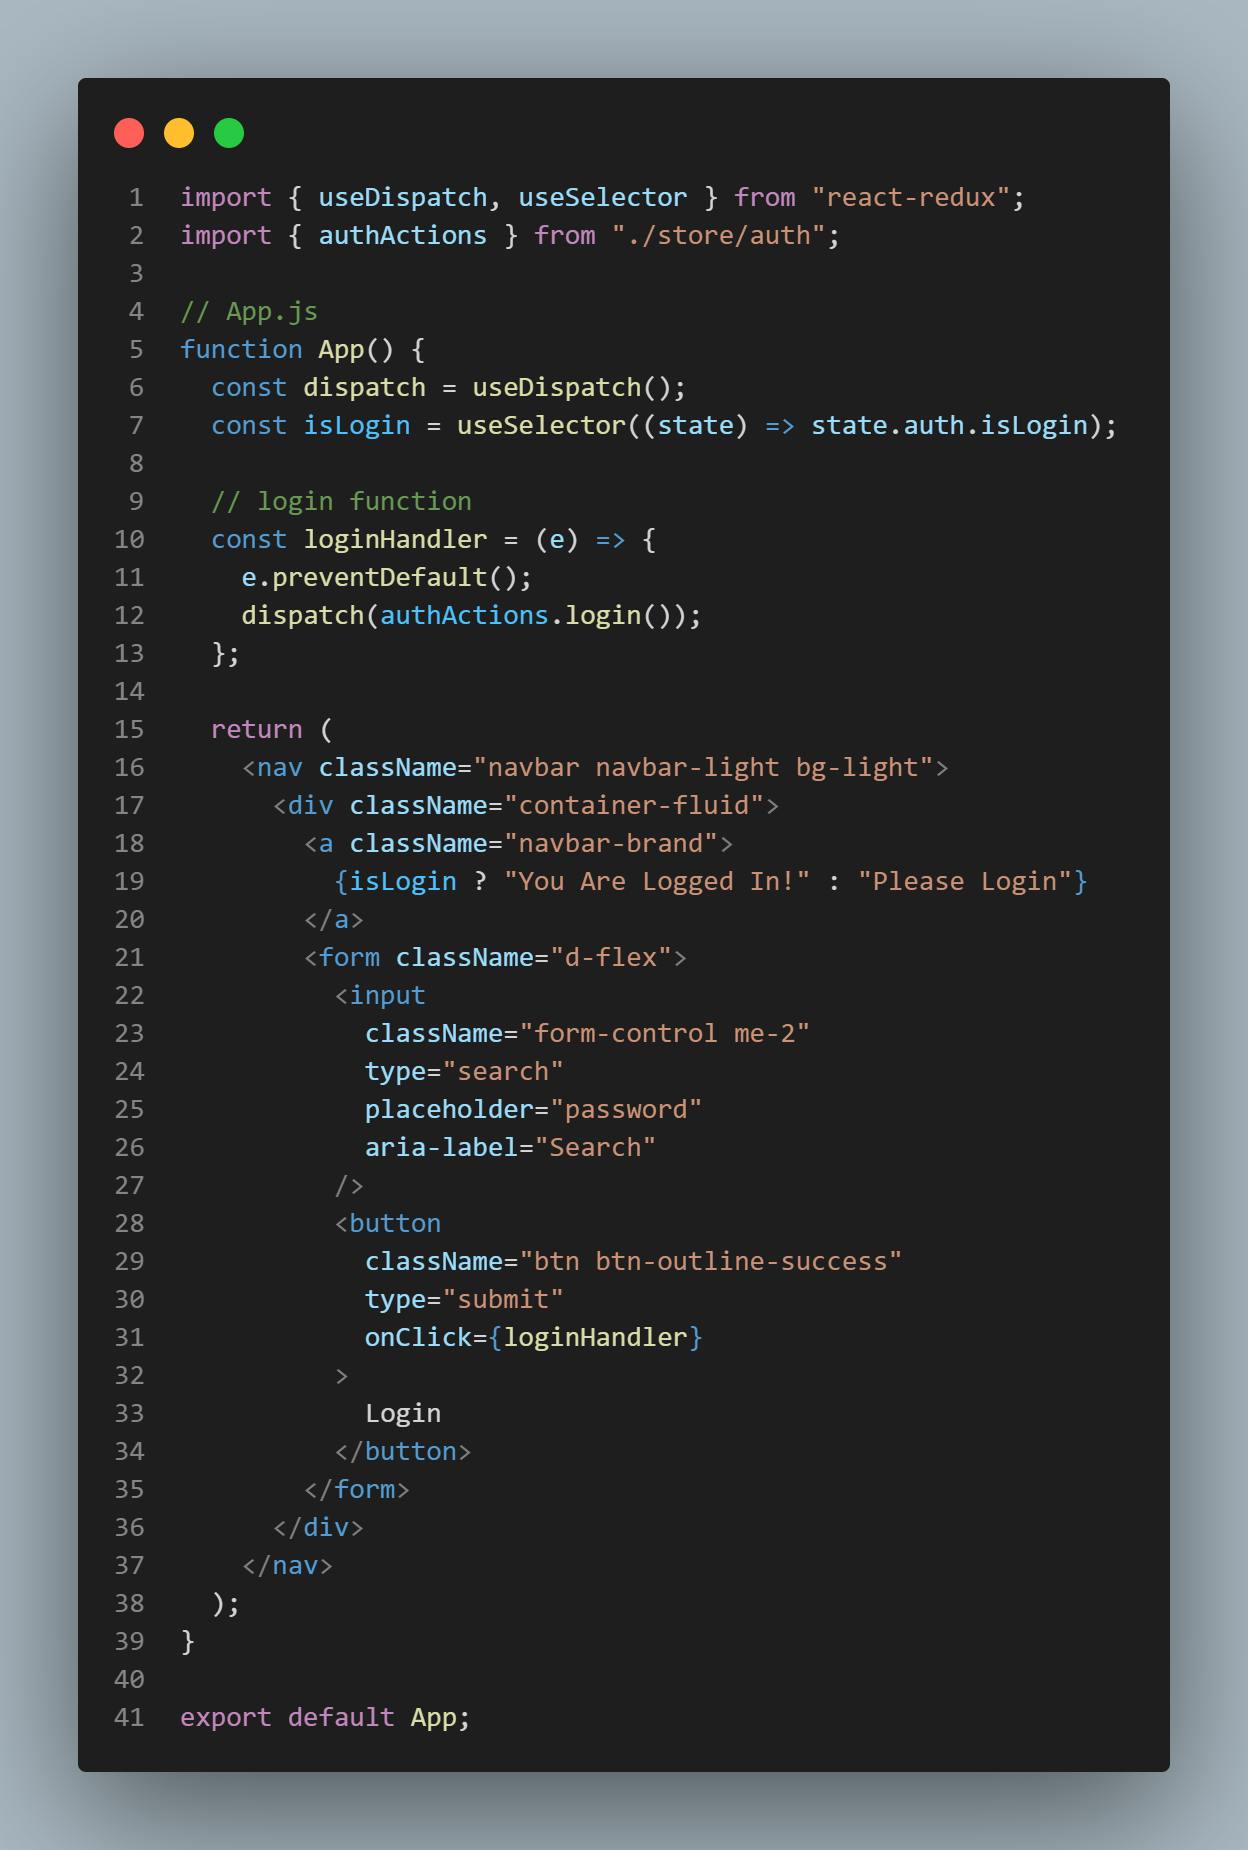
Why are we returning state.auth.isLogin? state is passed automatically by the useSelector hook, auth(the name we named our slice while configuring the store) is the particular slice isLogin is in and then we select isLogin.
We used the new state update, In this case, to simply render the text conditionally. if the login is true it shows "you are logged" if not it shows "please login".

What we just did
Let's look back at what we just did. when we click on the login button it dispatches a particular action which is the login reducer function, redux uses the login reducer function to then mutate the state. after the state is updated/changed the components subscribing or making use of that state are automatically updated with the new state which causes the entire component to rerender.
we can easily set up the logout function too in a similar way.

So far we have manually set the state in our store but what if we want to set the state dynamically let's say from a user's input. Our scenario here will be to get the user name from the input field and display it when the user is logged in. How do we do that? we can decide to create a new slice entirely just like we did with auth slice or add a new state variable to the already created auth slice, you can do either you will be right. in this case, we are going to add it to the already created slice- auth slice.
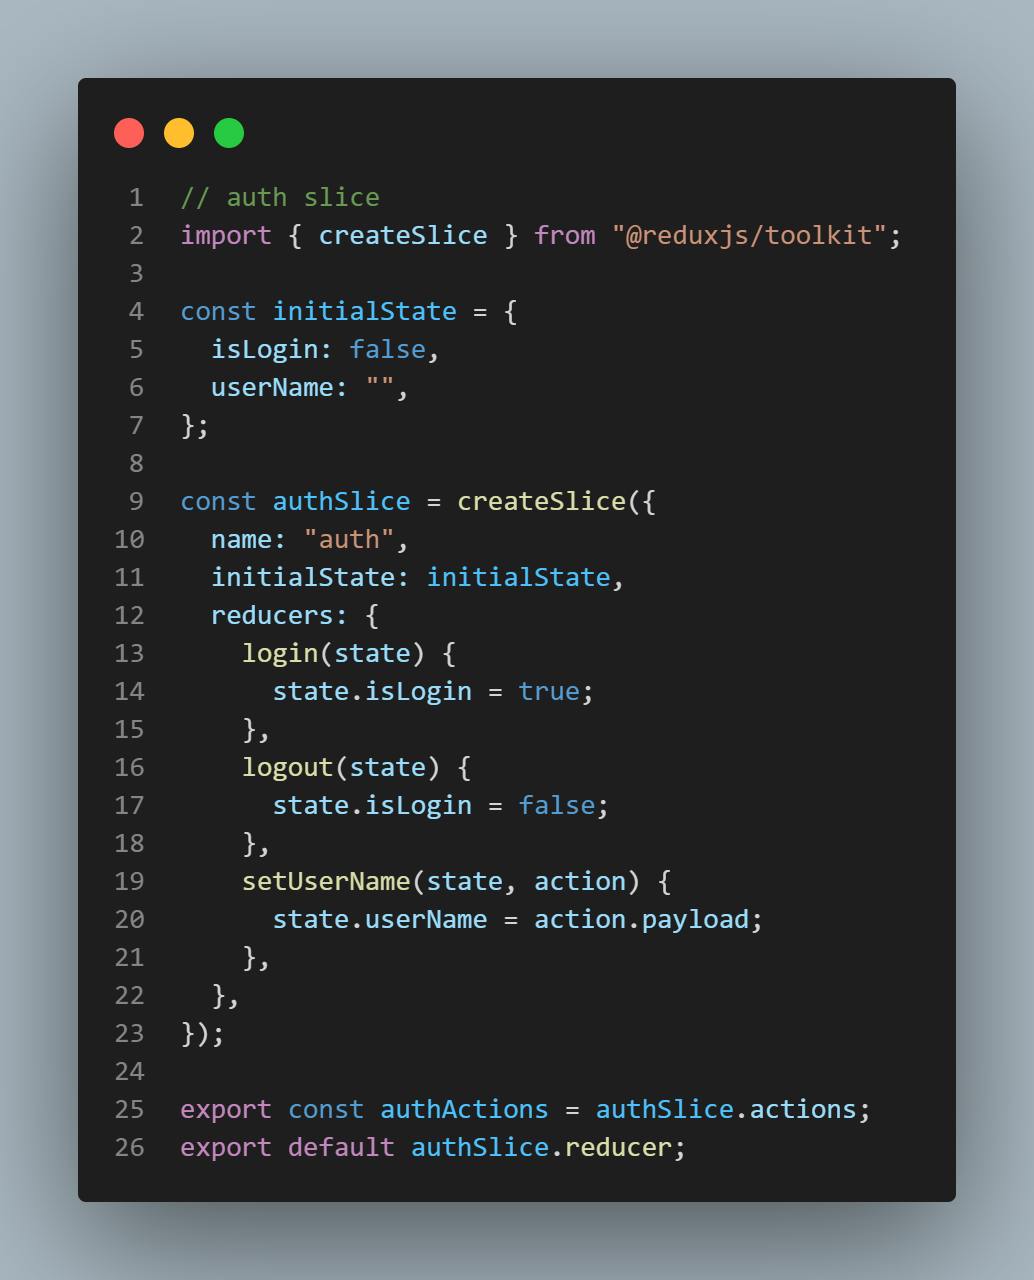
we go back to our auth slice file and add a new state variable named userName and set its initial value to an empty string, we then set up the reducer setUserName. you will notice, unlike the other reducer this particular reducer has two parameters passed in; state and action. What is action.payload? it will be explained in a bit...
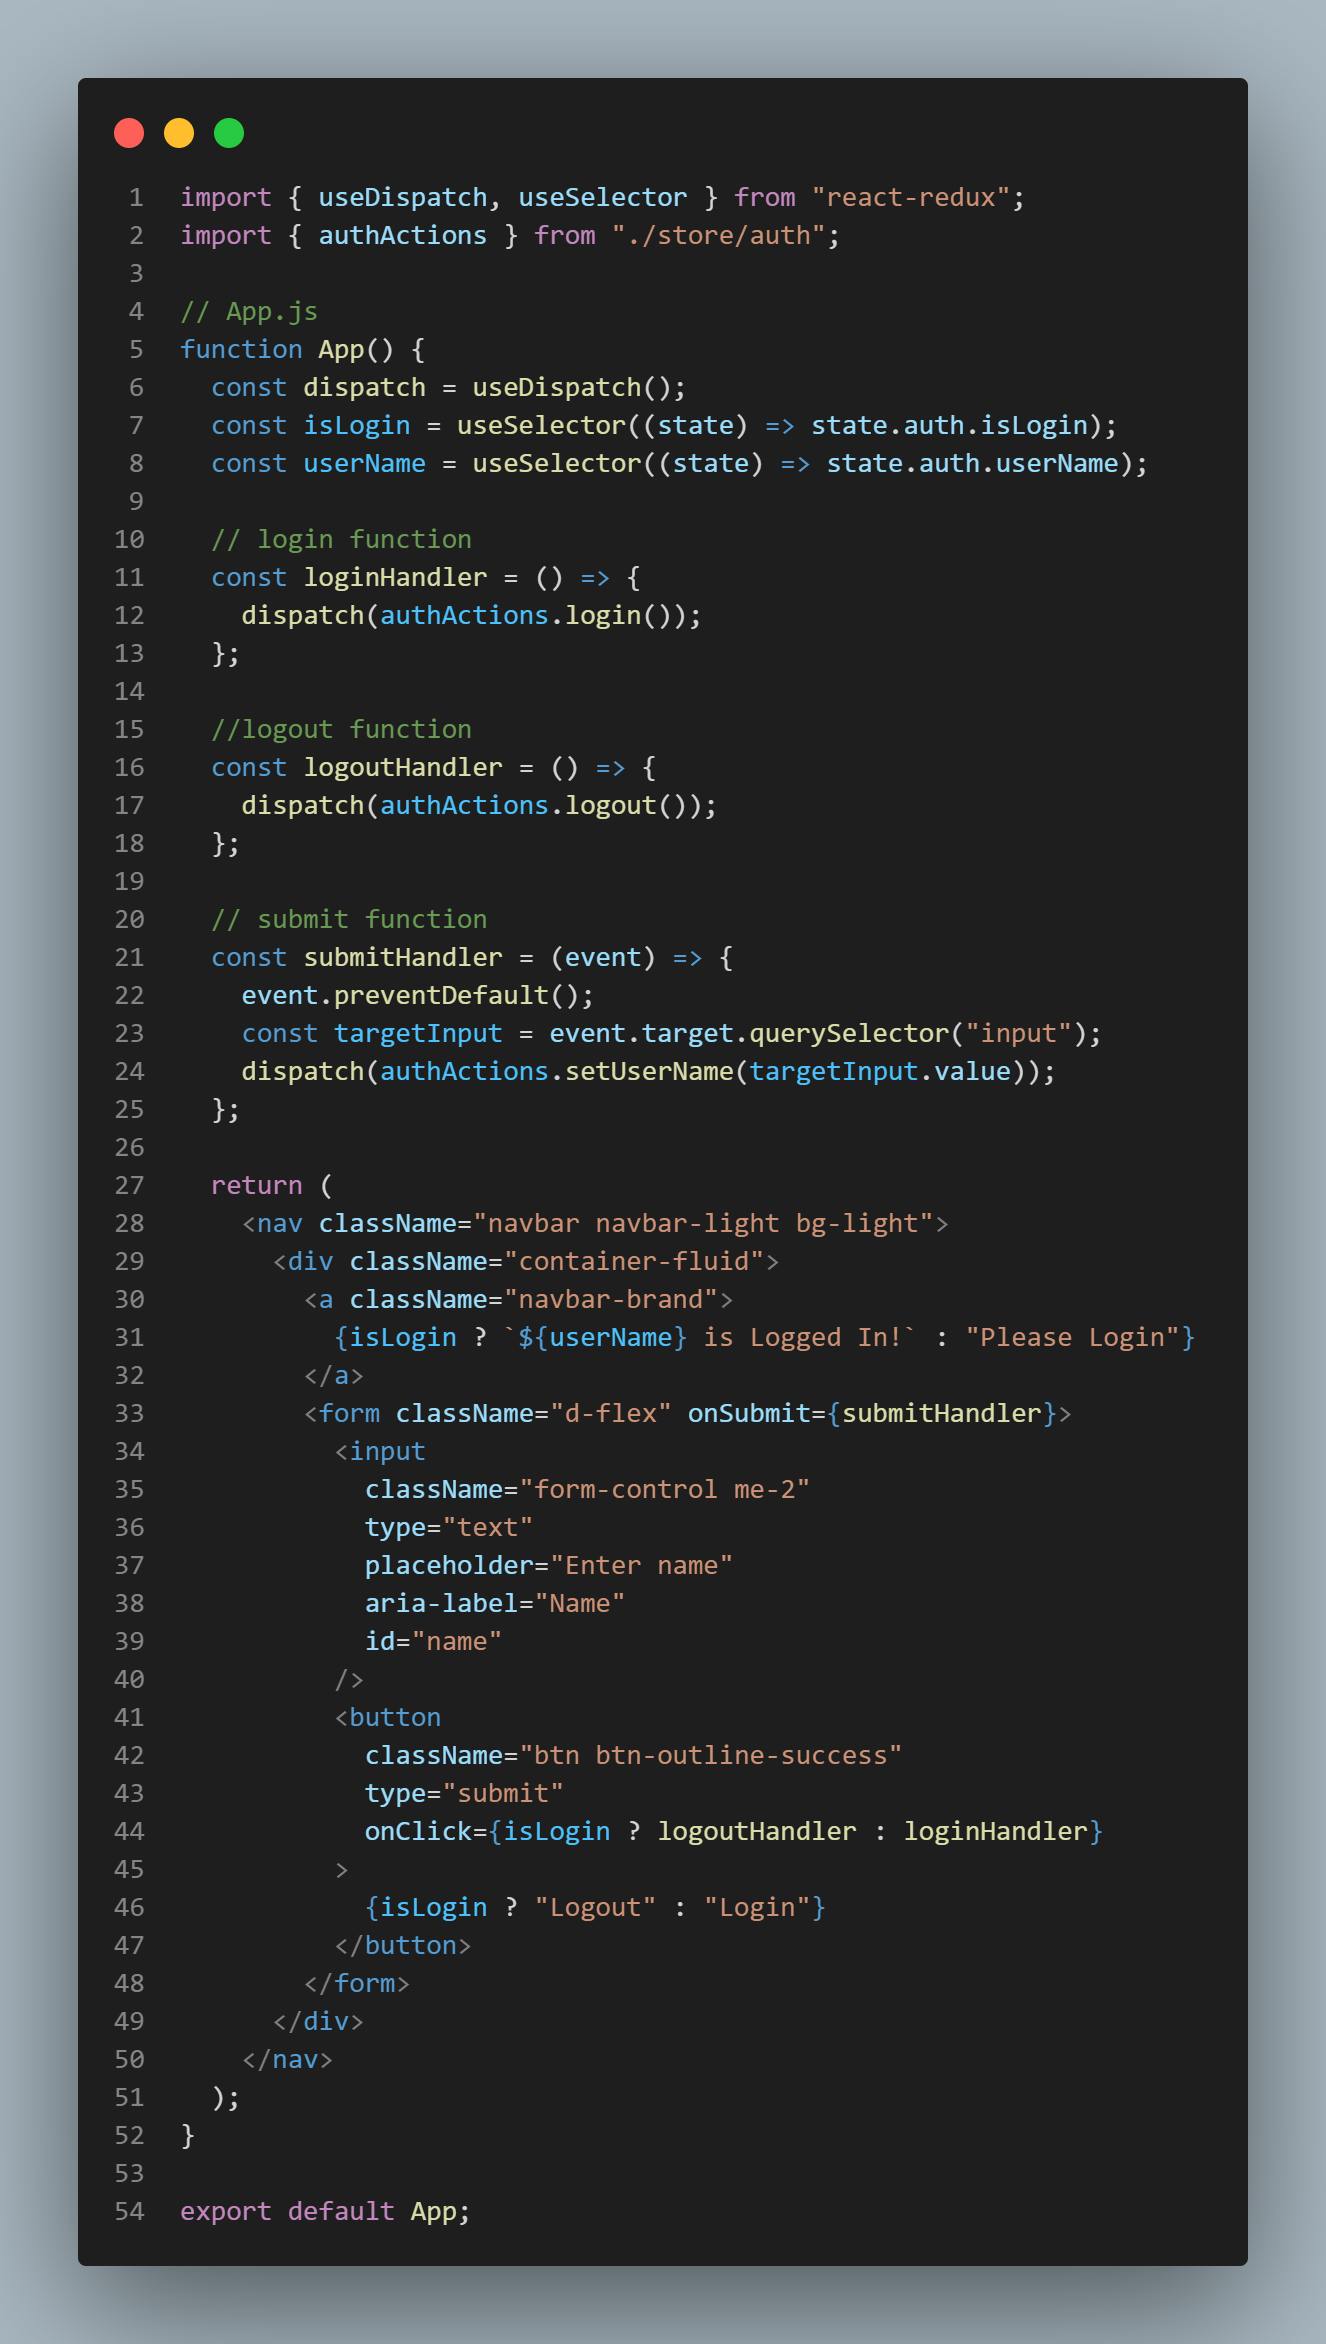
let's go to the app.js file and add a submitHandler function to the form tag. What we want is after the form is submitted we somehow can pass the user's input value to our state - userName. That is after the form is submitted we dispatch an action that changes userName from an empty string to whatever the user's input was.
Wait A Min!?!
Alright, we used javascript to get the user value from the input field. targetInput selects the input field, targetInput.value gives whatever the user's input was.
You will notice that when we pass our dispatch action this time around we are not just calling it (like the other dispatch actions) we are passing a parameter (targetInput.value) into the function. That is the action.payload. What is action.payload? action payload is equivalent to what was passed into the reducer function when it was dispatched.
Rounding up
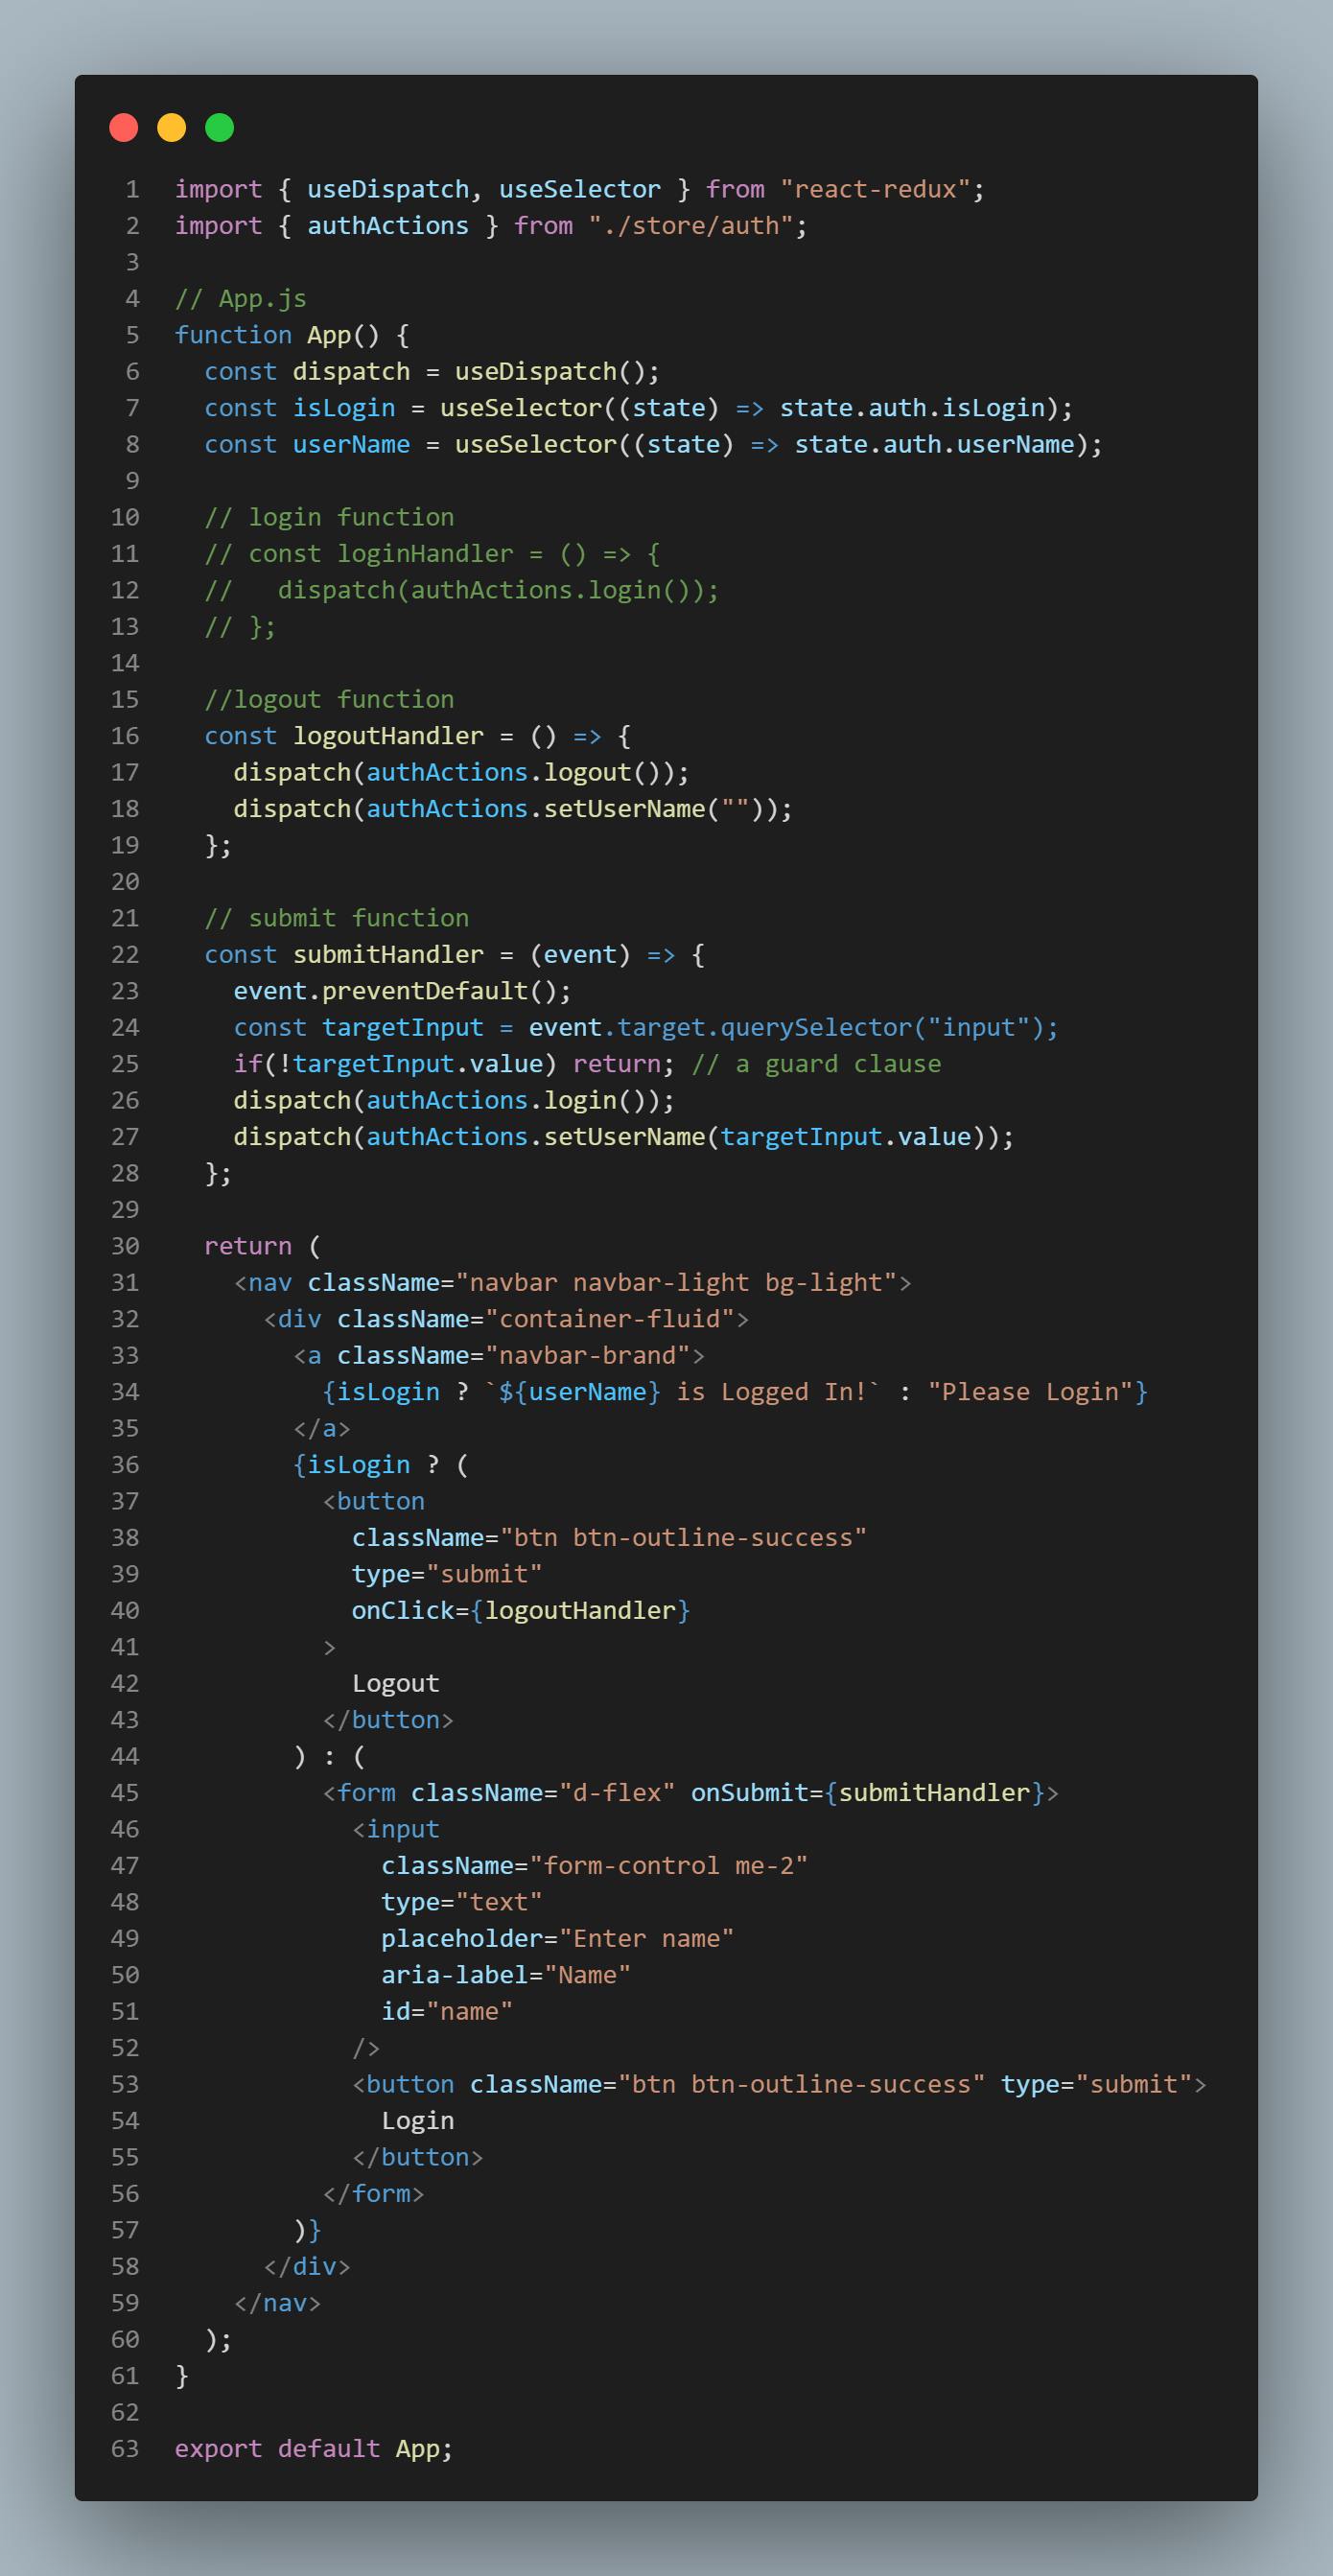
let's finish strong by fine-tunning our project a bit. You will notice loginHandler and submitHandler are doing the same thing. Let's refactor them by moving the loginHandler code into submitHandler. we can also twerk the UI a bit. when the user logs in we replace that entire form field with just a single button(logout). finally, we can add a guard clause to avoid the user's submission if the input field is empty.
And we are Done🥳🥳. Here is a sandbox for what we have done.